Only one version of our forest friends this time! While they may finish each others’ sandwiches, I did not finish all panels of this comic!
Years ago, during a serious political talk, the speaker’s pronunciation of beaurocrat sounded to me like “burro-crat”. The image of a donkey in a tie grabbed my brain and just stayed for years, so I finally made an image.

The phrase “brain, brain, go away, come again another day” popped into my head last night, so I made it into a graphic.

[image description: an illustrated brain with rain drops falling from it. Above the brain are the words “brain, brain, go away” and below the brain are the words “come again another day”]
This post builds on information in Demystifying Git – Git Commits
Git history is the record of what has happened in your git repository.
As we learned in Demystifying Git – Git Commits, each commit object stores information about who, what, and when for that commit object AND the commit ID(s) of any parent commits. Git history, therefore, is the who, what, and when for each commit AND the relationships between each commit and the prior commit(s).
Because we already covered the who, what, and when information in Demystifying Git – Git Commits, here we’ll dive into the relationships between each commit and the prior commit(s).
Git history is a directed, acyclic graph (DAG) where each commit is a vertex and the relationship from a commit to its parent commit(s) form the edges.
The relationship between two directly connected git commits is inherently directed because one commit is the parent commit and one commit is the child commit — We can’t flip that relationship and come out with the same history graph.
Additionally, our git history graph is acyclic — Because the list of parent commit ID(s) is included in the information that git hashes to create each commit ID, a commit can not be its own ancestor. Its commit ID does not exist yet and so can not have been stored as a parent commit already.
Because commits may have multiple parents, git history is not really a linked list. If visualizing git history as a graph makes sense to you, ignore this section — git history is a graph, so you’re good go go!
If, however, you’re a bit confused by graphs but linked lists make sense to you, you can use your knowledge of linked lists to think about git history. Taking the list of parent commit ID(s) as link(s) to previous nodes, traversing git history is conceptually similar to traversing one or more linked lists. A commit with a single parent commit links to a single linked list. A commit with multiple parent commits links to multiple linked lists instead of just one.
git log is the command you’ll use most frequently to view lists of git commits.
We can use git log to view slightly different information about the same history. The default git log output shows CommitIDs, Author, AuthorDate, and commit messages.
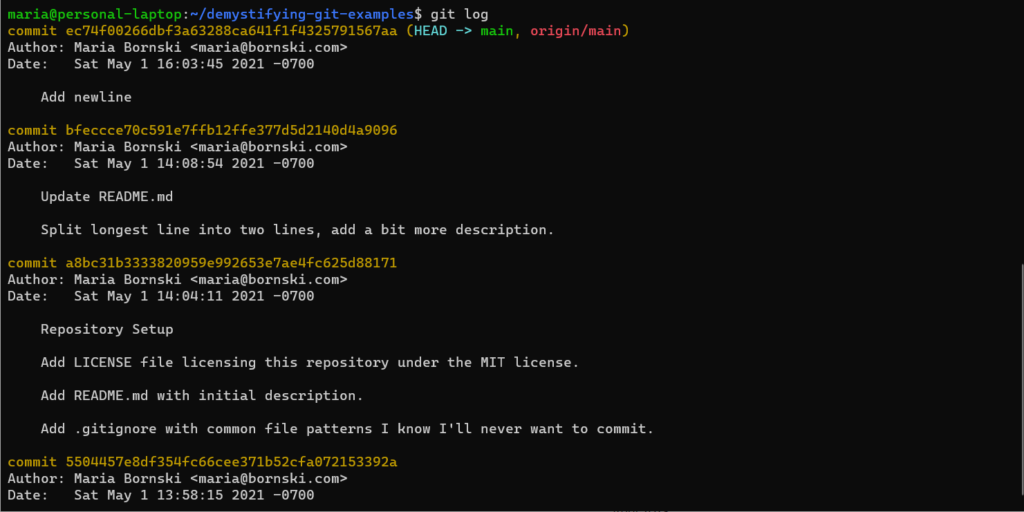
git log“If we want to see just commit IDs and the first line of each commit message, we can use git log --pretty=oneline

git log --pretty=oneline“I frequently want to see both Author and Committer information, plus what actually changed in the commit, so I use git log -p --pretty=fuller frequently:
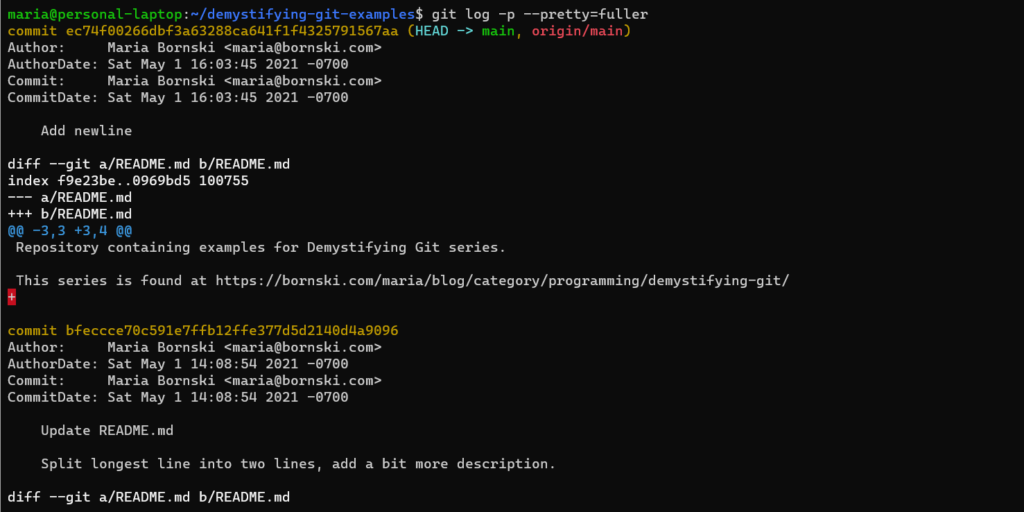
git log -p --pretty=oneline“If you’d like to learn more about ways of viewing git commits, the “Git Basics – Viewing the Commit History” chapter of “ProGit” has a good introduction to the git log command, as do many other online tutorials.
You can use git log to view the git history graph! By adding --all and --graph to our previous git log --pretty=oneline command, we can see a representation of the history graph for our entire repository:

git log --pretty=oneline --all --graphThis view may get hard to follow as our repository gets bigger, but it’s a useful option if you don’t have any other tools for viewing the history graph. You can include --graph on any git log command, but the longer your output for each commit, the harder the graph will be to follow.
In the past, I’ve often used gitk for viewing the git history graph. However, I’m writing this post using Windows Subsystem for Linux, so I’m not going to go down the rabbit hole of getting a Linux graphical program to work on WSL.
For a site built around git, GitHub sure makes it hard to view the history graph!
After some poking around, it looks like the “Network” view under the “Insights” tab has the right information. Here’s the network view for our demystifying-git-examples repository as it was after Demystifying Git – Git Commits:
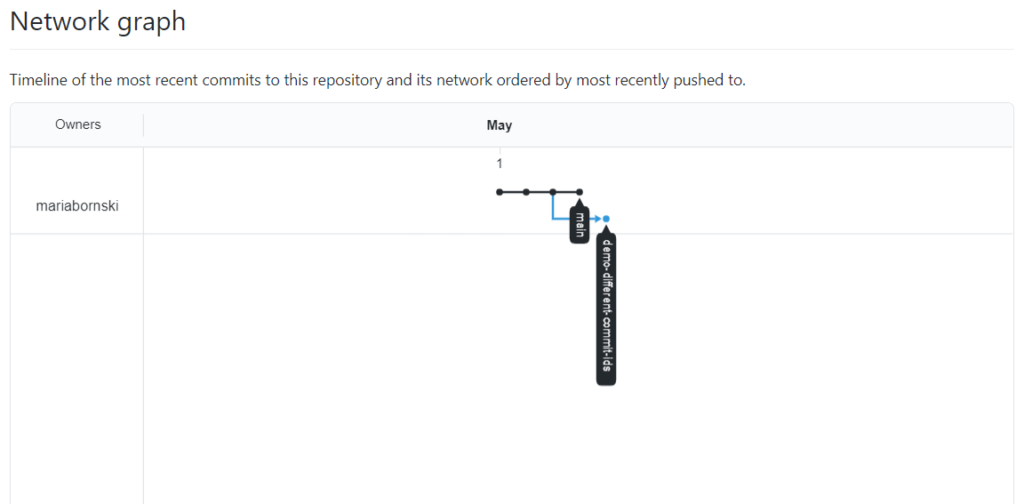
Note that right after Demystifying Git – Git Commits , our history graph is pretty simple — only 2 branches and no merge commits. As we build up this repository with more examples, the history graph will get more complicated
As I worked on this post, I did not find any “out of the box” solutions that let me show just the git history graph of a repository in an easy to understand way. I did, however, find a git alias example that formats git log output into a format that graphviz can understand. A lot of fighting with sed, awk, and escaping characters later & I’ve added a .gitconfig into demystifying-git-examples that will let me generate graphviz compatible output directly from demystifying-git-examples!

Now that’s a beautiful history graph!!
Unless I make more tweaks, I’ll be using the version of the graphviz git alias from commit 0148822ff of demystifying-git-examples. git won’t automatically pick up the checked in .gitconfig, but you can tell git to use it by running the following from within your local copy of demystifying-git-examples:
git config --local include.path ../.gitconfigNote that this does mean that if you check out a commit within demystifying-git-examples that does not contain this .gitconfig file, or has a different version of it, you’ll get different results from the git aliases. You may, therefore, instead want to copy/paste the git aliases into your global .gitconfig.
Once you’ve pointed git at the aliases that convert history into graphviz format, you can output the graphviz format from your history by running git graphviz <any other options you'd pass to git log> :
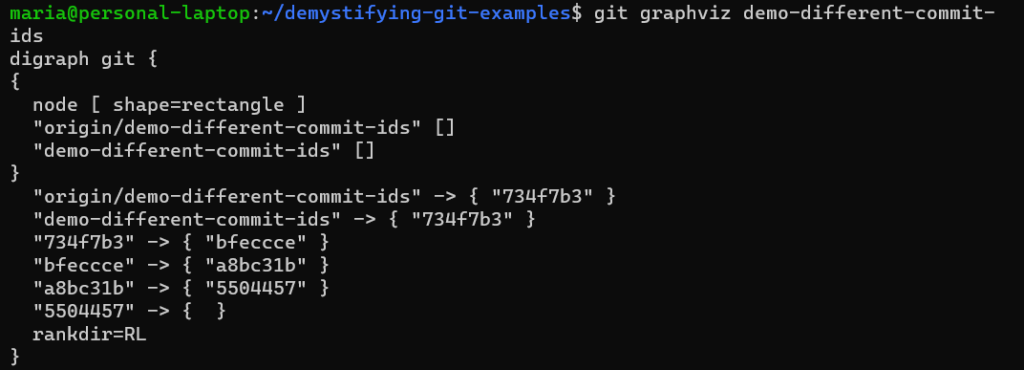
git graphviz demo-different-commit-ids“ I’ve set up the default output to include branch names in the graph, but if you don’t want that, you can use git graphviz-no-branches instead:

git graphviz-no-branches demo-different-commit-ids “The real magic comes when you covert this to an image. I’m using the dot CLI tool, which I installed as part of graphviz via sudo apt-get install graphviz. By piping our git graphviz output to dot, we can create an image file of our git history:

git graphviz demo-different-commit-ids | dot -Tpng -o demo-different-commit-ids-graph.png “And there we go, our git history graph I showed above:

I originally intended this to be a single post, but this got long! In Git History, Part 2, we’ll talk about how to navigate the git history graph to figure out what has happened in your repository!
All examples on this post were created using https://github.com/mariabornski/demystifying-git-examples, git version 2.25.1, and dot - graphviz version 2.43.0 (0) on Ubuntu 20.04.1 LTS (GNU/Linux 4.19.128-microsoft-standard x86_64).
You’re welcome to go clone the repository yourself & try out the commands! Similar commands will work on any git repository, you’ll just need to substitute your own commit IDs.
A git commit is the object that contains all the relevant information about your repository and files at the time of the commit. Commits are the git objects you’ll interact with most frequently, and everything in our series will build on this knowledge.
Git uses SHA-1 to calculate a hash of the commit object and the resulting hash becomes the commit ID. If any information about your commit changes, the SHA-1 hash will change (unless you’re intentionally running a collision attack, which is well outside the scope of this series, so we’ll ignore that possibility), thus resulting in a new commit object and a different commit ID.
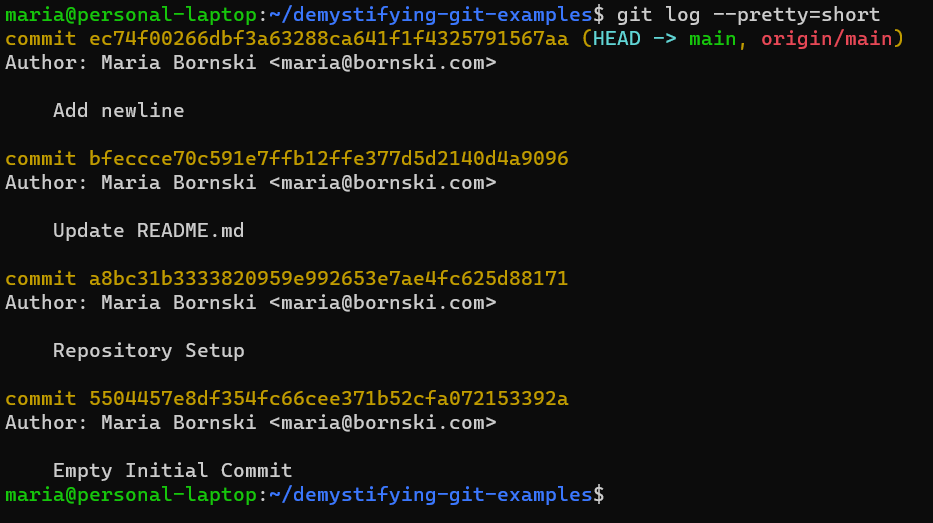
git log --pretty=short“For each commit, git stores a snapshot of all the files in your repository. This means that regardless of which files you changed in the commit, git can easily figure out the exact state of your repository at the time.
Git uses a “tree” object to contain information about other objects in your repository and uses SHA-1 to create a tree ID for each tree object. Any changes to the file contents, file names, or directory names in your repository will result in a different, thus resulting in a new tree ID for the new snapshot. The “Git Internals – Git Objects” chapter of the “Pro Git” book has a great deep dive if you want to learn more about git objects.
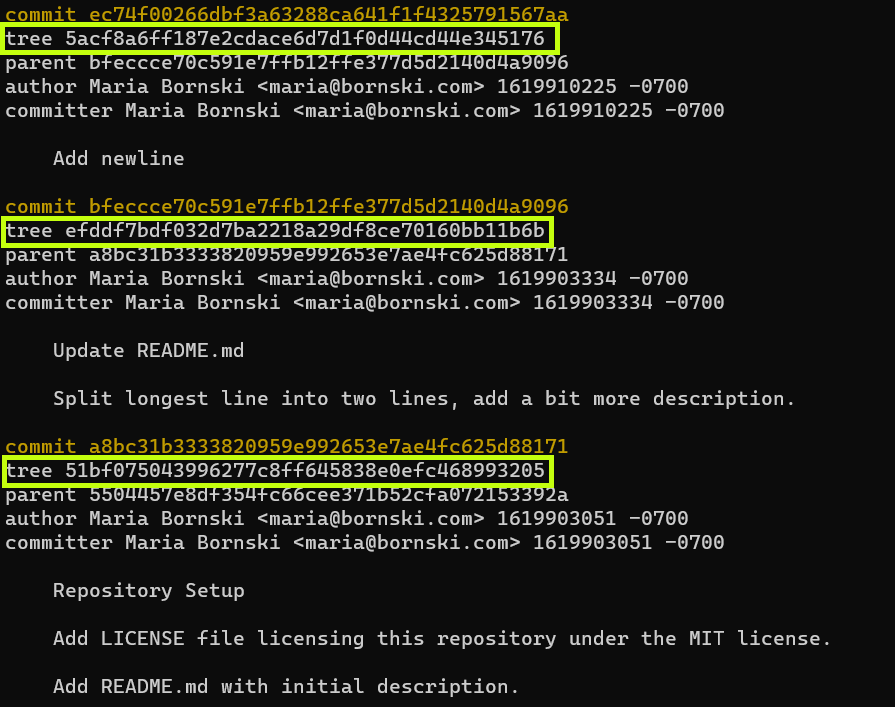
git log --pretty=raw ec74f0026“While git stores a snapshot of your entire tree, most commands to view git commits and git history display only the differences between commits. While this is often the information that someone wants to know, this method of display can mislead people into assuming git stores deltas or differences in the commit.
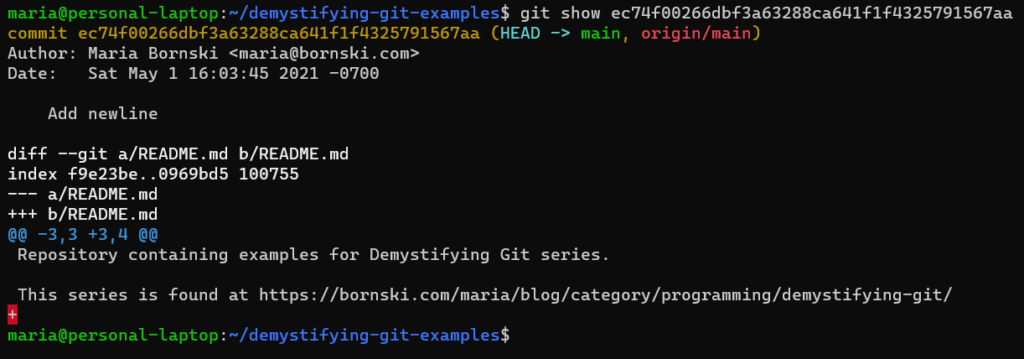
git show ec74f00266dbf3a63288ca641f1f4325791567aa“Git stores information about who worked on a commit and when the commit was created. Git was originally designed for Linux kernel development. In the Linux kernel community, developers who would like to make a change write their code and then send the change to the Linux kernel mailing list for discussion and code review. Once the relevant maintainer is satisfied, they incorporate the change into the kernel. This workflow means that more than one person is involved in every commit, so git keeps track of both Author and Committer information for each commit.
The Author is the person who originally created the commit. The AuthorDate is the timestamp of when the commit was originally created.
The Committer is the person who created this exact commit. The CommitDate is the timestamp of when this exact commit was created.
You can view the Author and Committer information by adding --pretty=fuller to commands like git log and git show. When you first run git commit and create a commit object, the Author and Committer information will be the same.
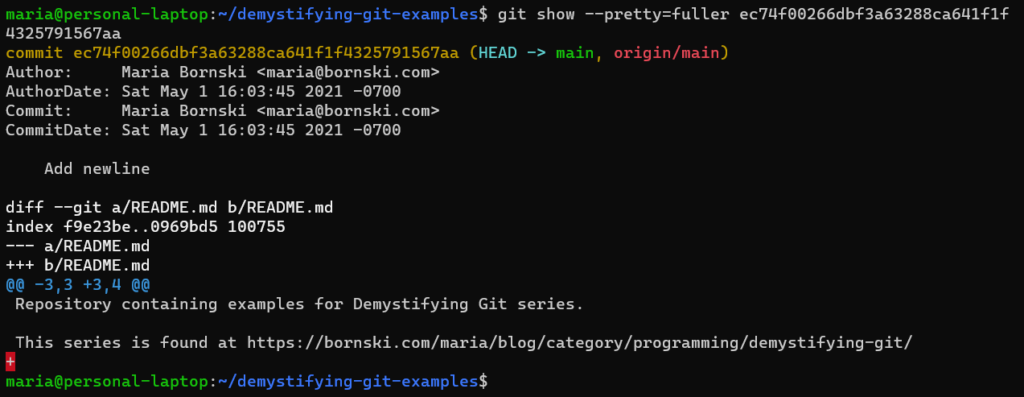
git show --pretty=fuller ec74f00266dbf3a63288ca641f1f4325791567aa“Any changes to the commit via commands like git cherry-pick, git rebase, or git commit --amend will update the Committer information but leave the Author information alone.
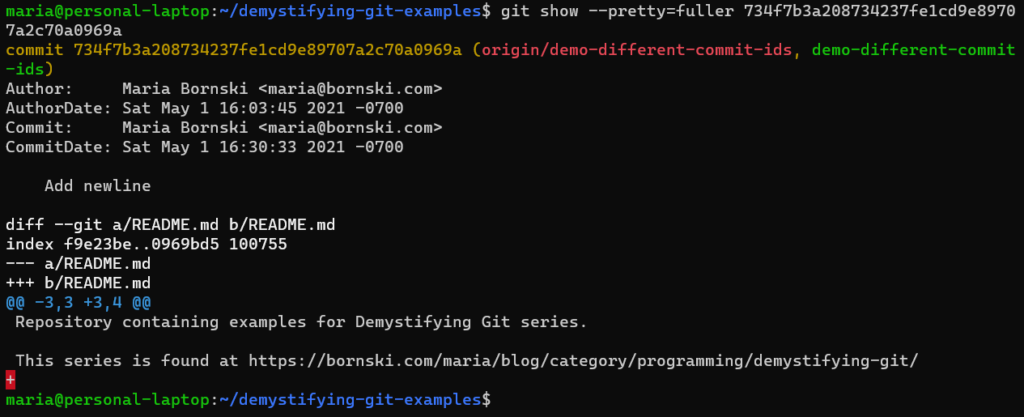
git show --pretty=fuller 734f7b3a208734237fe1cd9e89707a2c70a0969a“By default, git log will display the Author and AuthorDate, which can make history look a bit surprising. If you see a commit that says it was made earlier than the prior commit, it probably actually has a later CommitDate!
Git stores the commit ID(s) of any parent commits in each commit object. The very first commit in a repository will not have a parent commit.

git show --pretty=raw 5504457e8df354fc66cee371b52cfa072153392a“Merge commits will have multiple parent commits — One for each branched merged together. Most commits will have a single parent commit: the most recent commit on the current branch in your working directory at the time you created the commit.
The git commit message lets you explain your commit to your future self and other people looking at the repository. As with all other aspects of the commit object, any changes to the commit message will result in a new commit ID.
In the strictest sense, git commits are only the same if they are the literal same object — eg, they have the same commit ID. Two commits may make exactly the same changes to your files but if they have different parent commits, commit messages, Author information, or Committer information, then they are not the same commit.
As a concrete example, these commits are identical except for CommitterDate. They therefore have different commit IDs, so they are different commits.
We’ll talk more about how commit objects affect git workflows in future installments!
All examples on this post were created using https://github.com/mariabornski/demystifying-git-examples and git version 2.25.1 on Ubuntu 20.04.1 LTS (GNU/Linux 4.19.128-microsoft-standard x86_64).
You’re welcome to go clone the repository yourself & try out the commands! Similar commands will work on any git repository, you’ll just need to substitute your own commit IDs.
Git is used throughout the software industry these days, including for open source projects, in academic settings, and at software companies. Git is incredibly powerful and flexible and provides more than one way to accomplish any given goal. However, similar sounding workflow options can have very different effects on your repository, which can be really confusing if you don’t know what’s going on behind the scenes. This, then, leads to people fighting with git when all they wanted to do was write some code! I don’t want you to have to fight with your version control — I want you to be able to write your software!
In this series, I’ll first cover some git concepts foundational to understanding how git operates and understanding the differences between similar sounding git workflows. Later, I’ll cover more advanced and less common topics. As much of the series will build upon prior posts, I’ll do my best to be clear about which previous topics are most important.
In my professional life, I’ve worked with git for more than a decade and I’ve helped a number of colleagues become more comfortable with git. I’ve decided to start sharing this info more widely — blog posts can be read by a lot more people than I can personally talk to!
Additionally, I’m hoping to give one or more “Demystifying Git” talks and this blog series will allow me to go more in depth on each topic than a 20 or 30 minute talk.
All posts can be found under the “Demystifying Git” Category. I also plan to link posts from this page. If a topic is listed but not linked, I probably haven’t written the post yet!
TBD!
I went to try to install golang on my WSL install today, but my packages lists for apt-get were apparently out of date, so I got an error:
E: Failed to fetch http://security.ubuntu.com/ubuntu/pool/main/l/linux/linux-libc-dev_5.4.0-52.57_amd64.deb  404  Not Found [IP: 91.189.88.152 80]
E: Unable to fetch some archives, maybe run apt-get update or try with --fix-missing?
Theoretically, this should be easy to solve with apt-get update, as recommended right there in the error message, but I got an error there too:
$ sudo apt-get update
Hit:1 http://archive.ubuntu.com/ubuntu focal InRelease
Get:2 http://security.ubuntu.com/ubuntu focal-security InRelease [109 kB]
Get:3 http://archive.ubuntu.com/ubuntu focal-updates InRelease [114 kB]
Get:4 http://archive.ubuntu.com/ubuntu focal-backports InRelease [101 kB]
Reading package lists... Done
E: Release file for http://security.ubuntu.com/ubuntu/dists/focal-security/InRelease is not valid yet (invalid for another 22h 43min 18s). Updates for this repository will not be applied.
E: Release file for http://archive.ubuntu.com/ubuntu/dists/focal-updates/InRelease is not valid yet (invalid for another 22h 43min 31s). Updates for this repository will not be applied.
E: Release file for http://archive.ubuntu.com/ubuntu/dists/focal-backports/InRelease is not valid yet (invalid for another 22h 43min 55s). Updates for this repository will not be applied.
According to https://askubuntu.com/questions/1096930/sudo-apt-update-error-release-file-is-not-yet-valid, this happens if your clock is incorrect. My laptop clock looked OK, but the clock inside WSL was ~11 minutes behind. It turns out this is a known issue that the clock in WSL can get out of sync with the actual time clock: https://github.com/microsoft/WSL2-Linux-Kernel/issues/16 Luckily, the fix was quite simple:
$ date
Fri Jan  1 15:15:58 PST 2021
$ sudo hwclock --hctosys
$ date
Sat Jan  2 15:26:40 PST 2021
Running sudo hwclock --hctosys told WSL to sync its clock with the underlying hardware clock. Since that clock was already correct in my case, my problem was fixed and I was able to run apt-get update successfully, then install golang. And now that I’m documenting the solution for myself, it should be faster to figure out what’s going on next time!